")

Over the years, I have noticed the struggle some players have with making their own equipment sets. For whatever reason, they haven’t figured out how to do this and prefer to copy others, or wait to be instructed along the right path. FFXI has many intricacies, so having viable sets is half the battle, but I’m aware it’s difficult for some to understand all the details provided in our forums and wiki pages. Knowing the basics means you can make sets from scratch, and with a little practice, learn to do it well.
I know making a guide like this isn’t simple, nor quick, and explaining everything so anyone can understand it is paramount. Anything causing confusion should be cleared up, or further elaborated on. And no, I’m not claiming to know all there is, so this will be educational for me too. When we get to job specific sets, I may seek help from anyone maintaining guides. Til then, we should be able to cover the basics. The first subject will touch on damage taken sets, because survivability is key. Not knowing how to set them up hurts... literally. No jobs are exempt from this one.
Damage Taken Sets
The important part is knowing the stats which can protect us from incoming damage types. Tank jobs like Paladin and Rune Fencer bypass natural caps with equipment, while other jobs can do so with abilities. The game splits damage in to three types:
1) Physical Damage (PDT)
2) Magic Damage (MDT)
3) Breath Damage (BDT)
You can find these stats on equipment. Breath damage is rare, so you won’t need to gear for this unless you’re a tank facing a specific enemy. Most players make sets for PDT, MDT, and sometimes DT (overall Damage Taken).
Today, many pieces of equipment feature “Damage taken -%” stats. This covers PDT, MDT and BDT, and will count towards their individual caps, which is 50% each.
Now, while using equipment like Sakpata, Malignance, Defending Ring, Loricate Torque, Moonbeam Cape, and others, it makes capping easier than ever before. However, it’s not just about hitting the cap, there’s more to it than that. How do we push them further?
Physical Damage
I’ll give you a head start. Equipment like Flume Belt +1, Moonbeam Cape and Loricate Torque +1 are some of the best defensive pieces you can find. Not just because of their (physical) damage taken stat, but because of their base defense (DEF). After capping PDT, the next best thing is defense, which you gain more of from stacking DEF & VIT stats. According to BGwiki, for every 2 VIT you gain 3 defense, so it’s good to experiment with what you have to find the best.
Tip: The easiest way to find the best defensive pieces is to switch your choices around in your Equipment menu. Under your selection boxes are numbers following the fields “Attack” and “Defense”. This defense value gives your current, overall defense stat including VIT.
There isn’t much more you can do after DEF + VIT, but if you find yourself limited, I’d aim for HP & Cure Effects Received. But please, don’t sacrifice the other stats to get them.
Magical Damage
While MDT caps at 50%, it’s super important to remember that Shell V gives you 29%! So you only need 21%, unless you know you won’t be getting Shell V? When does that happen? Even WHM trusts give you this! It makes capping MDT a breeze.
There are two pieces you want after capping MDT: Warder’s Charm +1 and Engraved Belt. They offer special elemental resistances which you won’t find elsewhere, and there aren’t many other options outside them. If your job doesn’t appear on Engraved Belt, consider Asklepian Belt, Slipor Sash & Carrier's Sash.
The stat you want after capping MDT is Magic Evasion. Stacking this means you resist elemental magic and enfeebles more often, leading to less damage, fewer status effects, and more time playing your job.
Question: What happens if two pieces have the same Magic Evasion? = Pick the piece with the most magic defense bonus. If they have the same? Choose the one with more HP or MP.
Because the game doesn’t display your current Magic Evasion on screen (Windower might offer an addon), sadly, the only way to get the best MDT set is to use your head or pull out a calculator. Try different ways of capping 21 MDT, slot in the MEVA pieces, jot down the results, and see which comes out on top.
Overall Damage
This will be for specific emergencies. Like say, if you know what you’re fighting uses a mix of physical & magic damage, or you’re weakened/have lost buffs. It’s good to cap PDT & MDT here, for those rare cases you won’t have Protect & Shell V. What you add after capping is preference. You could aim for Magic Evasion, Defense, HP, Cure Effects Received, or even turn it in to a Hybrid TP set? But we’ll cover the last one later.
Is there anything else we can defend against? Technically yes! If you know an enemy is ready to enfeeble, you could use a set filled to the brim with 1) Magic Evasion, 2) Occasionally Increases Resistance to Status Ailments* & 3) Resist [Insert Status] equipment. It’s more for experienced tanks though, so don’t think you need it for other jobs unless the situation seriously calls for it.
*This stat is severely nerfed on anything checking as "Impossible To Gauge".
Bypassing Caps
Now we know how regular caps work, it should be known that the universal cap is 87.5% for players and pets, which is an extra 37.5% damage taken. Tank and pet jobs have an easier time bypassing caps with equipment (using Physical/Magic Damage Taken II), while jobs like Black Mage & Dancer have abilities to do this. We'll cover more advanced damage taken sets at a later date.
Idle
Running between battles, recovering from weakness, or low on MP? An Idle set may be beneficial. There are many ways to go with the following stats: Regen, Refresh, Regain (TP), Auto-Reraise and Movement Speed.
To begin with, figure out what you need. If your job doesn't need MP, then you won't need Refresh. Every job can make use of Regen, but please remember to not get confused by stats which boost the enhancing spells Regen & Refresh. You can tell the difference because the stat which boosts the spell is called "Regen" Potency +##%, while idle Regen is simply called "Regen"+#
For the sake of this set, only aim for "Regen" and "Refresh". Here are some options for all jobs:
Yorcia Alluvion Skirmish Equipment w/ Regen augment (Leaftip)
Reisenjima Geas Fete Equipment /w Refresh augment (read Phalanx section first)
Bathy Choker +1
Infused Earring
Dawn Earring
Chirich Ring (+1 replaces Paguroidea)
Sheltered Ring (also boosts Protect/Shell)
Scuta Cape (reduces movement speed)
There are other equipment which are more job specific, like Jhakri Robe for mages, and Meghanada for light melees. Kumbira Cape is a better alternative for mages over Scuta, because it gives the same Regen without the movement speed reduction.
Speaking of which, equipment like Carmine/Blood Cuisses, Jute Boots, Herald's Gaiters and Skadi's Jambeaux offer movement speed. Some players like to add a piece to their idle sets, because they most likely have it equipped as they run from one place to another, but it's your personal preference.
Another macro you may consider, especially if you play WAR/PLD/DRK/BST/SAM/DRG, is one which brings in the Crepuscular/Twilight Helm & Mail. When used together, they gain the stat "Auto-Reraise", which has proven to be a lifesaver in sticky situations. So long as you keep the set on, you will always have Reraise, therefore getting endless opportunities to run yourself out of a bad spot.
Lastly, some equipment have the stat "Regain". This is mostly found on the Gleti's Odyssey set, Turms Cap (Superior 3), Ratri Sallet (Superior 3), and Valorous Mask (Geas Fete). As a melee damage dealer, I like having the option to build TP while waiting for buffs or during weakness. Combined with Samurai's Meditate ability, you get a head start by having TP before engaging.
There's also a very rare body armor for WAR/PLD/DRK/BST/SAM/DRG called Makora Meikogai which gives a Regain "Sphere" effect. This means others get extra TP in your party. You won't get any TP, but it's fine because there are no self-Regain body pieces. I got two of these from AMAN Trove (aim for a Loud Thud), and the only other way is defeating Pazuzu in Escha-Zitah. You would more likely get it from AMAN than Pazuzu, but I wouldn't try too hard because the Regain is small. If you do get one, every little helps!

TP Sets
There are many types of TP set, from melee, to range, to pet, and we’ll cover the basics of all three in this category. It’s crucial to have good TP sets so you can weapon skill more, or in the case of pets, make their moves stronger.
Melee
The first thing you need to learn is how Haste works, because how much you have drastically changes how your set looks.
Suggestion: Let me be frank, not everyone uses Gearswap, and this guide doesn’t assume you do. Gearswap users have it easier because they can switch TP sets for (almost) any situation, but for me that’s too much! I’m not carrying around extra gear and updating tons of sets. I wouldn't expect you would either, however, serious melee jobs need more than one, and how many you have increases as you grow. For example, my DRK has about 9? Because after years of play I have learned to cover all bases.
What you need to understand is how Attack Speed works. Let me try to simplify this for anyone struggling. The game has an 80% cap on delay reduction and there are three collective ways of reaching this: 1) Equipment Haste 2) Magic Haste 3) Job Ability Haste.
With Magic Haste capping at 43.75% (448/1024), we need 36.25% from elsewhere. We are told to cap Equipment Haste at 25-26%, and this is true for every job except Dark Knight because it gets access to the ability Last Resort. We’ll cover this in Advanced sets though, so don’t think about it.
How do we cap Magic Haste? There are few ways. I think it’s important to know what counts as capped Magic Haste, because it plays a part in some jobs.
(Credit to Wotasu for the edit) How do we cap Magic Haste? There are few ways. I think it’s important to know what counts as capped Magic Haste, because it plays a part in some jobs.
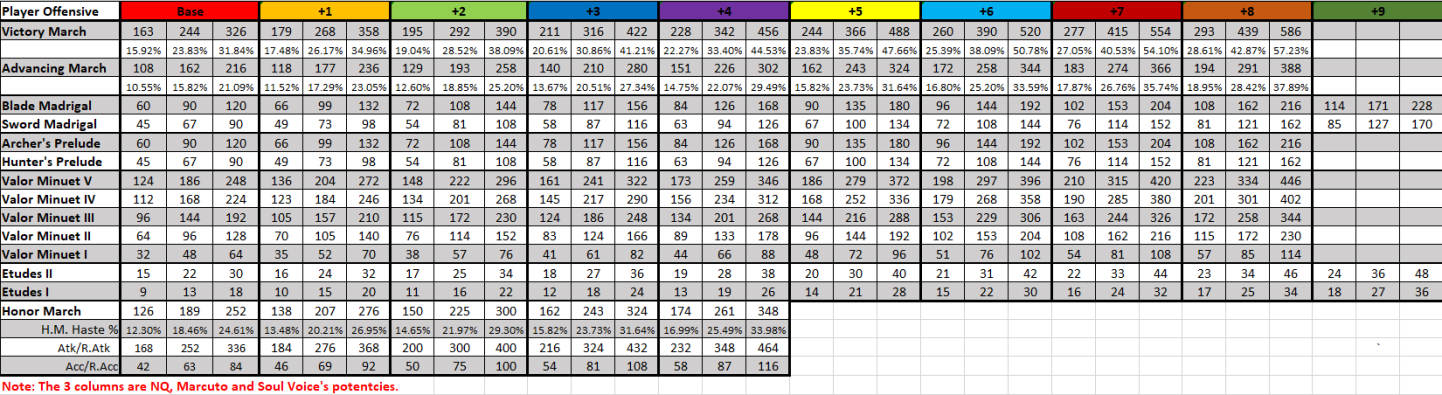
- Using Trusts Koru-Moru & Ulmia caps (with 2 marches), because Haste II (307), Advancing March (108) and Victory March (155) equals 570/1024, which is more than enough.
- A real BRD using March Songs will give a higher value of Magic Haste depending on their Song+ value, Trusts have +0 while a player can achieve up to Song +8 for March which will raise their March Haste%. +8 Advancing March is 18.95% & Victory March is 28.61% Haste Value. Honor March's max value is only Song +4 (from neck+hands because no +song from instruments) and can then hit 16.99% Haste Value.
- Haste I (15%) & Indi/Geo-Haste (29.90%, if 900 combined skill) will cap magic haste.
- Haste II (30%) & Mighty Guard (15%) will cap Magic Haste too, but harder to keep up over a longer fight.
- Garuda’s Hastega II (30%) is the same value as RDM’s Haste II(30%).
- Blue Mage's Erratic Flutter is 29.98%, but it shares the same buff spot as Haste I & II, so Mighty Guard(15%) from Blue Mage is still useful.
**JA & Equipment Haste**
It’s important to remember that Haste Samba is not classed as Magic Haste. Like Last Resort & Hasso, it is classed as Job Ability Haste, which is 5% while used as a sub-job. Dancer can enhance it up to 10%.
[The following assumes Magic Haste is capped] Combining Hasso + Haste Samba is 15%, which SAM/DNC can solo and would only need 22%* in Equipment to cap. DRG/SAM gets 20% with Hasso and having their Wyvern called, so they only need 17% haste to cap. It's important to remember that Hasso only works with weapons which can be paired with a Grip, so DNC/SAM would not be able to reach 20% with daggers.
*I wouldn't make TP sets to factor in other's Haste Samba. It's impractical to rely on someone else keeping Samba active on everything you fight.
With no kind of JA Haste it’s impossible to reach the true cap, so all you can do is focus on hitting 25-26% Equipment Haste. Why 25-26%? Because some haste values on gears are not exact. For example, a piece of gear could have 3.9% instead of 4%, so 26% guarantees this, but I wouldn’t try too hard because 25% is acceptable. 24% isn’t enough unless you have 13% JA Haste minimum. 27% or more isn’t terrible, but you want to sacrifice some for better stats unless it’s impossible? Then don’t worry. Over capping isn’t anywhere near as bad as under capping.
**Getting it together**
Now we know how it works, your first order of duty is to ensure your TP set hits the Equipment Haste cap. After that, accuracy plays a huge part. For beginners, use /checkparam on yourself and aim for 1000+ accuracy. Later on, you’ll be wanting 1100-1200 and rarely higher depending on content. Most melee jobs aren’t difficult to reach 1000+ with. Dexterity also counts at a rate of 3 accuracy per 4 DEX. Also, remember buffs and food like Sublime Sushi boost your accuracy.
Yet, Haste and Accuracy are not the only stats we need to consider. For 1-handers like Warrior, Dark Knight, Dragoon and Samurai, multi-attack stats are amazing. Store TP is useful, but only if you know exactly how much you need, so we’ll cover that in advanced. For beginners, I would look for as much Quadruple/Triple/Double attack as possible. Monks get access to Kick Attacks as well, which is its own unique form of multi-attack.
Tip: When you count up Multi-Attack, think of it this way: Quad attack counts as 3 extra hits, Triple Attack as 2, and Double Attack as 1. As an example, if you have a choice between 3 Quad Attack versus 8 Double Attack, you would pick 3 Quad Attack because it’s 9 extra hits versus 8 Double Attack’s 8.
**Dual Wield**
Another thing to consider for jobs wielding two weapons is the stat Dual Wield. Depending on your job & overall haste, the amount of Dual Wield will change.
Because DW lowers the amount of TP you gain in exchange for lower delay per hit, it’s advisable to only use as much as is really needed. It might be difficult to calculate, but luckily for us, the above link takes you to a page (scroll to the bottom) with a “Dual Wield Cheatsheet”. Find the tier of DW your current job has and how much Haste you will be getting, and the table will tell you how much is needed.
As an example, if I am playing master THF/NIN (T4) with magic haste capped, I’ll need 6 DW, which is covered by using Reiki Yotai or the two Delve earrings. Using both options would be bad because it lessens my TP per hit without lowering delay.
While building a set for a Dual Wield job, you need to 1) Cap Haste, 2) get the right amount of DW, 3) find enough Accuracy for what you’re doing, 4) stack up on Multi-attack, and 5) make use of any other stats like Store TP or Attack.
Ranged
Ranging for TP doesn't happen often, but when called upon it's important for Rangers & Corsairs to know how to TP efficiently.
The single biggest stat you'll need to stack up on is Ranged Accuracy (RACC). Agility works the same as DEX, as it increases RACC by 3 for every 4 AGI. Again, you can use /checkparam to check how much you have, and the recommended values are similar to regular Accuracy (see earlier).
After this, unless you're using job abilities like Double or Triple Shot, you'll be wanting amounts of Store TP. Ranged Attack often comes with RACC and is rarely found on its own, so I don't think about it. Something else you can look out for is Enmity- because it lowers hate building and keeps the target on your tank. However, these stats are only useful in what Rangers/Corsairs call their "Mid-Shot" set.
While ranging, we can make use of unique forms of haste called "Snapshot" & "Rapid Shot", which are only ever used in what is called a "Pre-Shot" set.
Imagine you are firing at an enemy. The Pre-Shot set takes place just before you draw your weapon. The Mid-Shot set comes in while your weapon is drawn, but just before shooting. I think it's important to share a macro to show how this works. Assume Pre-Shot is /equipset 11, and Mid-Shot is /equipset 12.
/equipset 11
/ra <t>
/wait 1
/equipset 12
Preparing your shot begins immediately after your Pre-Shot, while your Mid-Shot comes in a second later before your character shoots. It's crucial to press your macro once, otherwise you can accidentally fire in Pre-Shot. You need to wait til completely firing to press the macro again, so you can smoothly repeat the process. This takes practice, and the timing changes with the combination of Pre-Shot and the Red Mage buff "Flurry".
Note: The above macro may not be the most efficient if you play Ranger. Read the Corsair Quick Draw section for the explanation.
**Snapshot, Rapid Shot & Flurry**
While shooting without Flurry, we are subject to a 70% Snapshot cap from ALL sources. This includes Ranger's Snapshot Merit category, and Corsair's Job Point gifts (after reaching 1200), each granting 10%. Anyone using a Red Mage subjob can give Flurry, which is an extra 15%. RDM96+ can apply 30% from Flurry II.
This means Rangers/Corsairs should prepare 3 Pre-Shot sets: 1) without Flurry, 2) with Flurry, and 3) with Flurry II. No, I'm not kidding! This shouldn't be overlooked, because the speed difference is extremely noticeable. For anyone who doesn't want to count, this means you'll need the following Snapshot values:
Ranger (Snapshot 5/5) & Corsair (1200+) = #1. 60% #2. 45% #3. 30%
Note: Ranger's Velocity Shot is the third way of lowering ranged delay and is calculated separately to Snapshot & Rapid Shot. You do not need to factor this in.
So you might be thinking, where does Rapid Shot play in to all this? Well, it's best described as being Snapshot II. It allows you to bypass the 70% cap so you can fire rapidly. According to Wiki it has a 99% cap, but reaching it is tedious, so it's best to stack as much as you can after capping Snapshot. This is why it's important to have three Pre-Shot sets for your Flurry state, because you can stack way more Rapid Shot with Flurry II than you can with no Flurry at all. There is no penalty for stacking Rapid Shot if you are not capping Snapshot for some reason.
Tip: Your Pre-Shot sets only need equipment with Snapshot/Rapid Shot. If you check sets on the forums, you will see plenty of blank spaces. This is because there are no Snapshot/Rapid Shot gears in those slots, so there's little point adding anything because they only appear for one second per shot. Also, don't include weapons... because you lose TP this way!
There are other ways to gear while ranging for TP, but they will be discussed further in advanced sets. What's most important is having at least one Mid-Shot set with a ton of RACC, along with three Pre-Shot sets for your Flurry state. This means you'll have three Range TP macros, but believe me, it's worth the effort.
--Corsair's Quick Draw Bullets--
Back in 2013, I accidentally shot my brand new Animikii Bullet while out in the field. I never found out how strong the shot was, but a couple of years later, I began a thread after firing a third: Keeping the Animikii Bullet.
I wanted to include this in the advanced section, but the above ranged macro is questionable, and for good reason. If you're a Ranger, you might want to change your macro to look something like this:
/equipset 11 <wait1>
/ra <t>
/equipset 12
Why? Because it ensures your Snapshot gear is coming in on time and leaves no doubt about mid-shot. It's a more efficient way of shooting, so why don't I do it this way? Well, it's because Corsair's have Quick Draw bullets like Hauksbok and Animikii. Because I don't use Gearswap, I had to produce counter measures in all of my macros.
For the majority of sets I make for Corsair, I ensure they have my preferred bullet. The only sets which don't are Magic Attack Bonus bullets for Wildfire & Leaden Salute, along with the special bullets I mentioned for Quick Draw. I won't go in to how I macro my Quick Draw and Weaponskill's here (check the link for those), but I will show you what I use to range for TP.
/equip ammo
/wait 1
/equipset snapshot
/ra <t>
/wait 1
/equipset midshot
While it isn't the quickest way to shoot, I haven't fired a Quick Draw bullet in over six years, ever since I went to this extreme to make sure. I can't prove that my whole Snapshot set is coming in on time, but I've never experienced any problems with speed, nor power of my attacks. If there is a more efficient way of doing this using in-game macros, please feel free to shoot me a private message. Otherwise, this remains the way I range for TP on Corsair. Luckily, getting these bullets aren't anywhere near as troublesome to get as they were back in the day.

*Artwork by Mistform05
Pet
Pets work like players, as they are subject to a 25% haste cap (using Pet: Haste) and enjoy plenty of accuracy, multi-attack and Store TP. However, there are many other ways we can gear for Pet TP. Sometimes, you might want to TP with your character and pet at the same time, but making a set like this sacrifices stats on both ends (not saying it's bad). You may consider hybrid damage taken + TP sets so your pet can survive better while gaining TP for moves. Puppetmaster is unique because it can gear for ranging, but doesn't make use of Snapshot/Rapid Shot because there isn't any for pets.
While a pet's TP isn't pivotal (survival is priority) like a melee damage dealer, maximizing it at the right moments will change the course of battle. Unlike weapon skills, pet abilities are stuck behind timers, and most will need some TP to activate. Having more TP usually makes them more potent, so getting enough to reach the next level can make the difference. You have to know how your abilities work, so do some research and figure out how TP affects them. Taking Beastmaster as an example, damage, along with enfeeble duration, varies based on TP.

Magic Sets
Now we have covered damage taken and TP, it’s time to pay attention to mages. This section will go over many things.
Fast Cast
It’s important not to neglect Fast Cast, because it takes longer to cast spells without. It’s also good to remember the best way to lower recast timers is to keep Fast Cast in, but it’s rarely better to do so.
If you read the Ranged TP section, you’ll understand Pre-Shot & Mid-Shot. Spells work similarly, except Fast Cast serves as the Pre-Shot, while the Mid-Shot will change depending on the spell and when it's cast. No, you won’t need three different Fast Cast sets! Although, you might want two depending on your sub-job. This is because Fast Cast caps at 80%, and Red Mage support job (level 35+) gives you 15%. Therefore, you might want a set with 80%, and another with 65%.
The extra casting bonuses from Scholar’s Light Arts/Dark Arts and Red Mage’s Composure do not count towards the 80% cap, so please don’t factor these in. However, Scholar has access to Grimoire spell casting, which we’ll cover in advanced. Rune Fencer has access to a trait called Inspiration, which also exceeds the standard cap. There are other forms of spell casting stats for curing, enhancing magic, and so on. Because they are so specific, I wouldn’t use them at all. There should be enough options in the game to hit casting caps without.
Tip: Every job can use Fast Cast to call Trusts faster! If you want to speed this up, find what you can and equip the set before you summon them.
What happens if we cap Fast Cast and have leftover slots? Here are some options which are 100% preference.
1) Want to reduce the recast timer in your Fast Cast set? Cap Haste as well, because that will help lower recasts, but won’t make spells cast any faster. You can only do this with a select few spells though, like Trusts, Blink, and a few others which cannot be further enhanced.
2) Stack up on HP or MP, depending on your job. Rune Fencer benefits from HP because a Fast Cast set might be 2-300 points lower than others, so it makes you slightly more vulnerable. Mages might enjoy MP in the same way, because it’s nice to have a larger pool for Refresh to replenish.
3) Damage Taken stats. Because most of your equipment will need some Fast Cast, it leaves you vulnerable in a sticky situation. So if you like the idea, stack up on PDT, MDT and Magic Evasion.
**Using Fast Cast in a Macro**
How do we use a Fast Cast set in a macro? Very much like the above example in the Ranged TP section. Imagine we’re making a nuking macro to cast Thunder V quickly for maximum damage. The Fast Cast set is /equipset 90, and the Nuke set is /equipset 91.
/equipset 90 <wait1>
/ma “Thunder V” <t>
/equipset 91
Alternative: I don’t use the above example because I like to save macro spaces. Depending on the battle, casting Elemental Magic differs between standard nuking and Magic Bursting, and writing out the above macro means you need duplicates for every spell. If that works for you, go for it! The macro is reliable if you don’t mash it repeatedly; otherwise you end up doing less damage in your Fast Cast set.
I have my Fast Cast, Nuking and Magic Burst sets in separate macros, and using a keyboard helps to be more precise, although it still requires practice to become second nature. This is my play style while nuking: 1) Hit the Fast Cast macro (sometimes twice to be sure), 2) Find the spell and begin casting, 3) Mash the Nuke/Magic Burst macro repeatedly as my character moves.
If done right, you get the result of a quick casting spell for maximum damage, without needing duplicate macros for every spell. I only do this for Elemental Magic though, I don’t go this far for Cures, Enhancing or Enfeebling Magic. Also, you don’t need Fast Cast for every spell! For example, Dia is extremely fast in both its casting and recast, so adding Fast Cast is pointless. Try out your spells to see if they need a boost.
Defensive Spells
One thing mages have over other jobs is a group of defensive spells called Stoneskin, Phalanx, Aquaveil, and Blink. Because Blink is like a Ninja’s shadows, there isn’t anyway to enhance it, so all you need is to speed it up with Fast Cast. I can’t stress enough, not only how important it is to use them regularly, but to make equipsets specifically for them.
Stoneskin, Phalanx and Aquaveil can be enhanced with gear, and you should seek them out as early as possible. You might feel you don’t need them because you are standing away out of danger, but what happens when a tank dies? What if the monster resets hate? And what if the enemy attacks you for healing too much? As a mage, you are never completely safe, so it’s healthy to get in to the habit of keeping these spells in your rotation.
This also applies to anyone using the Red Mage support job, because you get access to these. Always begin the spells in Fast Cast and switch in to the right set using the same macro we looked at in the Fast Cast section. Why? Because it saves time and there’s less chance the enemies will interrupt your casting during battle.
**Stoneskin**
Use the above link to find the equipment your job can use to enhance Stoneskin. Make sure you get the strongest piece for your job. For example, if you are a White Mage, you’re better off using Shedir Seraweels & Nodens Gorget over Haven Hose & Stone Gorget, because they add more HP to Stoneskin.
While BGwiki talks about Enhancing Magic skill & MND, you really don’t need to gear for these stats, because reaching the caps are as easy as leveling your job. What else can we add to the set? If your job has access to any Enhancing Duration equipment, I would add those in any slots which aren’t being taken up by Stoneskin gear. I wouldn’t bother using any of the Stoneskin casting time equipment, because you’re not starting the spell in this set.
What about any leftover slots? Well, at this point it becomes preference. You could use Damage Taken stats, HP, MP, Conserve MP, Spell Interruption Rate, or a mix of these. There’s no right answer here. Use what you think is best.
**Phalanx**
Phalanx is the toughest defensive spell to maximize because it requires a ton of luck, but when it is, you will notice a gargantuan difference. Tank jobs like Paladin & Rune Fencer try harder than anyone to gear for Phalanx, but other jobs should at least think about it.
The first order of business is to reach 500 Enhancing Magic Skill to cap. You can enhance Phalanx further, but it requires augmented gear. When you get a Phalanx augment, it won’t work if you cast it on others, because it’s actually a “Phalanx Received” stat. There are some gears with the Phalanx Received stat on it without having to augment; like the Rune Fencer relic headpiece.
Because of this, some players make two Phalanx sets: 1) 500 skill & Enhancing Duration for others, and 2) 500 Skill, Augments & Enhancing Duration for yourself.
If you don’t want to go crazy, but want to do your best to enhance Phalanx, the easiest way is to get Alluvion Skirmish armor. With Duskdim stones, you can get up to Phalanx +3 on each piece. However, only these jobs can make use of it:
(Yorium) WAR, PLD, DRK -- (Taeon) MNK, RDM, THF, BST, RNG, NIN, DRG, BLU, COR, PUP, DNC, RUN
Notice how Red & Blue Mage are on there, but the other mages aren’t? It’s unfair, but the only other way to get Phalanx augments is via the exceptionally random & frustrating Oseem NPC in Norg. You can augment Reisenjima Equipment with Pellucid, Fern and Taupe stones here, but this isn’t the way to get Phalanx. Oseem has an option to trade him the “Dark Matter” Vagary item for an exceedingly random augment with no limits, which let’s face it... isn’t cheap! The chances of getting a Phalanx augment is very rare, and even then, it might not be high. So I’m telling you now, do NOT go to the Auction House and start buying Dark Matters.
Wait a minute?! How do I get Phalanx augments if you’re telling me not to buy Dark Matters?
The reason I’m telling you this is that you can get Dark Matters for FREE! When SquareEnix announces the Monthly Campaigns, they occasionally add the "Dark Matter Arcane Glyptics" campaign. This means you get 6 free Dark Matter attempts per real-life day (resets at JP midnight), without having to trade him any. All you do is trade him the equipment and you will get the option under “Techniques”. Sometimes SE will add a Dark Matter PLUS campaign, which gives you 12 attempts a day, instead of 6.
If you’re super lucky, doing this can net you up to Phalanx +5 per piece. However, you’re playing a lottery here, so all you can do is visit Oseem each day and not hope too much. If you have any mules with access to Oseem, you may send augmented Reisenjima equipment to characters of the same account, so you can get more attempts this way. In the end, don’t feel bad if you can’t get the best of the best Phalanx augments, because many of us are still waiting for it to happen.
**Aquaveil**
It’s the easiest of the three to understand. You don’t need any Enhancing skill or augments, and the only way to enhance it further is with Aquaveil+ equipment. There aren’t many options, so click the above link to find the list and gather what you can. Aside from the Nibiru Faussar Great Sword, the equipment can only be used by mages.
Because Aquaveil helps to cast spells without interruption, there’s nothing more frustrating than struggling to cast because it wore off and you can’t get it back on. At a higher level it will stop at least two interruptions before wearing, and Aquaveil+ increases this to a maximum of 7. In the heat of battle, not being able to cast can mean the difference between winning and losing.
Therefore, while Enhancing Magic Duration helps, the spell lasts a long time without, so it may be beneficial to focus on Spell Interruption Rate (SIR). Or you can make two sets: 1) Duration for when it’s safe, and 2) SIR when you’re in danger. If you can get away with using both, I’d recommend it.
Question: How Does Spell Interruption Rate Work?
While there are many ways you can be interrupted, SIR only works against physical damage. The cap is 102% and provides 100% protection if you reach it. You can find SIR as a regular stat and as an augment, with equipment like Telchine being augmentable for up to 10% per piece. If applicable, include the Merit Point category toward the cap, which is an extra 2% per upgrade, and a max of 10%. You can find equipment with 20-30% each, so reaching 102 isn’t as tough as you might think.
What if you’ve reached the SIR cap and added enhancing duration, but there are leftover slots? At this point I’d go for Magic Evasion, because you could still be enfeebled, and Spell Interruption Rate won’t stop that.
**Barspells**
Barspells increase your magic evasion against the element or enfeeble you are fighting against. When you can, it’s best to pair Barspells together. For example, if you want to reduce the chance of Petrify, cast Barstone & Barpetrify. To resist Paralyze, use Barblizzard & Barparalyze, etc. Check the link to see how this works.
Barspells last a long time with no form of enhancing duration, but you can increase it further if you like. The spells potency relies on Enhancing Magic Skill, with a cap of 500 skill. To save making a new set, you could use the 500 skill Phalanx set (for others) from earlier. However, you can also find a unique stat called “Elemental Resistance” on the Shedir Seraweels, so if it changes anything, you may need to make another set. White Mage is the only job with options for Elemental Resistance, so you’ll need a new set, but we’ll cover this in the advanced section.

Healing
Without healing we’d beat nothing in the game, so anyone who can assist should want to do so in the best sets possible. Any high-level job using Red or White Mage support job will get Cure IV, including Paladin & Scholar at level 55. There are tiers to gearing Cure IV, which you should try to do in the following order:
1) Cap Cure Potency at 50%
2) Add Cure Potency II, which caps at 30%
3) We should fill leftover slots with Healing Magic Skill, MND and VIT.
How do you decide which stats to use for #3? Try to remember it this way. Every 1 Healing Magic Skill is equal to 2 MND or 4 VIT. Also, remember that 2 MND or 4 VIT only counts if your character’s overall stat is an even number divisible by 2 or 4 (check your menu).
e.g. 200 VIT is better than 199, but 199 would act the same as 196-198. 200 MND is better than 199 & 198, but the last two numbers aren’t any stronger than the other.
Let’s practice this. If it lines up, having 19 Healing Magic Skill would be like having 38 MND or 76 VIT. I always like to count up Healing Magic Skill like it’s MND, because it makes it easier to decide what to use, at least in my mind.
Imagine we have two earrings (no, we can’t use both in this scenario), with one having 3 Healing Magic Skill and the other 8 MND. You would choose the MND because 3 Healing Magic Skill is like having 6 MND, which is 2 less. Now, what if the first earring actually had 3 Skill & 8 VIT? It would beat 8 MND because it would give you the equivalent of another 4 (10 overall) at most.
Have I lost you? Don’t worry, it’s rare you ever get stats this close together, but if it happens and maths isn’t your thing, try using a calculator or a multiplication table. Just remember that your character's overall MND and VIT stat only increases the potency of Cure with every 2nd and 4th number, in the same way 1 Healing Magic Skill would.
**Self Heals, Weather & Other Spells**
The most important thing to remember is you’re best off stacking as much Healing Magic skill first, and MND second. VIT hardly ever plays in to it because you need so much of it. Because every slot in the game gets one of these three in decent amounts, you won’t need to think about anything else. That is of course, til you want to make a set to heal yourself. When making a self healing set, hitting the Cure Potency I and II caps still matter. Only this time, the third tier is about capping Cure Potency Received at 30%, or at least as close as you can. You would then fill out the other slots with Healing Magic Skill/MND/VIT.
And then there’s the hair in the soup called Weather bonuses. If you’re entering an area always under Light Weather, or you know for sure you will get Aurorastorm from your Scholar support job (or Aurorastorm II from main Scholar), you’ll want a set with Hachirin-no-Obi to boost Cure by 10%. You can go even further using a Chatoyant Staff, but remember that you’ll probably lose a lot of Cure Potency and need a major rethink of your set. I’d say for anyone serious about healing, at least make a set with the Obi for these situations. Also, remember that Double Dark Weather gives you a -25% penalty, which encourages you to get an Aurorastorm with an Obi even more.
Question: Should I use Fast Cast in my Cure macro? = Yes, I don’t see why not. The quicker you can heal your allies, the better chance you have of surviving. However, I’d only go this far if you plan on being the main healer. Red Mages get a ton of Fast Cast naturally, so the only jobs who should consider it are White Mage, Scholar and Geomancer. Otherwise, it’s probably not needed unless your Cures are playing a pivotal role.
Finally, let me say that Curaga and Blue Magic spells work differently. Instead of Skill/MND/VIT, the formula is switched drastically to MND/VIT/Skill, with every 1 MND being equivalent to 3 VIT or 5 Skill. You still want to cap Cure Potency though.
**Cursna**
The best thing about healers isn't just about restoring HP, it's about keeping you alive and kicking. Whether that be using Erase or the -na line of spells (like Stona for Petrify), anyone playing the healer role needs to be aware it's not always about curing. Erase & -na spells, most jobs can't enhance them and they already cast pretty quickly. White Mage is the only job which can cast Erase on their whole party, but needs a Yagrush Mythic Weapon to do so. They can also Erase up to two status effects with the same spell by using the Cleric's Torque.
There is an exception though, which involves repeatedly casting Cursna on anyone inflicted with the dreaded status "Doom". The reason it's so feared is because it gives a timer telling you when it will KO your player, and the only way to get rid of it is by using the Holy Water item and Cursna. The most annoying thing? Neither are 100%, but you can enhance Cursna & Holy Water to give a much increased chance of overcoming Doom. Not having a set prepared is scary, so don't overlook how valuable it is. If you're a tank, you may consider helping out with a Cursna Received set.
If you're a White Mage, I would recommend looking at Cursna sets because there are a lot of options. The rule of thumb is to stack up on Cursna equipment, and fill the rest with Healing Magic Skill. The BGwiki page explains the interaction between the stats Healing Magic Skill, Cursna, and Cursna Received. Here is a list of available Cursna equipment usable by jobs other than White Mage:
Hieros mittens (10%)
Gendewitha galoshes +1 (10%)
Oretania's cape +1 (5%)
Menelaus's Ring (20%)
Ephedra/Haoma's Ring (10%/15%)
Malison/Debilis Medallion (10%/15%)
Next up is a list of Cursna Effects Received (CER) & Holy Water (HWE) Equipment which experienced tanks should consider getting, but if you're new don't worry about it:
Nicander's Necklace (20% CER, 30% HWE)
Gishdubar Sash (10% CER)
Purity Ring (7% CER 7% HWE)
Saida Ring/Eshmun's Ring (15%/20% CER)
Shabti Cuisses/+1 (10%/15% CER) - PLD DRK WAR only
Blenmot's Ring/+1 (5%/10% HWE)
**Waltz**
While not technically classed as a magic set, it is a job ability used for healing, so I don't think it's a crime to put it here. Curing Waltz is much like other healing spells and you should think about making a set in the following way:
1) Cap Waltz Potency at 50%.
2) Only if self healing, cap Waltz Received Potency at 30%.
3) Stack as much Charisma (CHR) as you can find.
4) Vitality (VIT) lightly boosts self heals.
Playing Dancer as a main job, you may want a set for self healing and another to heal others. It's also important to remember that CHR & VIT enhance a main Dancer's waltz far more than someone subbing it.
Question: Is a Waltz set worth it in the current game?
Gearing for a support job Waltz is nice, but you have to carry around more equipment. Think about if this is necessary, because 95% of the time you'll be using trusts. It's super rare that having a full strength support job waltz makes the difference, but the strength of a Curing Waltz III is noticeable when geared for.
Say for example, you wanted to solo Salvage as THF/DNC when trusts aren't allowed, having a Waltz set would prove useful. You have to decide if this is worth it or not, and I can't answer that for you. However, if you're a main job Dancer, then you have no choice but to make these for the good of yourself and any party you join.

Enhancing
There are many types of Enhancing Magic, some of which we already covered in the Defensive Spells section. Here are some more, but please know that any exemptions will be saved for the advanced section.
Regen/Refresh -- If you read the Idle section, you will know the difference between the stats "Regen/Refresh potency" and "Regen+/Refresh+". Scholar is known for its Regen V, so an experienced player in this job may use a Potency set, much like a Red Mage uses Artifact Body & Amalric Coif to enhance the potency of Refresh III.
Enhancing Regen & Refresh differs between jobs, but it's mostly about increasing duration. Both spells last longer if casted in equipment with Enhancing Magic Duration, and there is also the stat "Regen Effect Duration" which does not conflict with anything. The Telchine set from Adoulin content is a great starter because it can be augmented with a maximum of a multiplicative 10% Enhancing Duration per piece with Skirmish stones.
Do you want to increase Refresh duration on yourself? You can make use of a stat called "Duration of Refresh Effects Received" (works like Enhancing Duration and won't conflict) on gear like Gishdubar Sash, Grapevine Cape and Inspirited Boots, but it won't work on other players. Also, there is no such stat as Refresh Effect Duration, so you have to make do with Enhance Duration, Effects Received & Potency.
You will be pleased to know that not only do these spells cast quickly enough to not need Fast Cast, they don't require Enhancing Magic Skill to cap potency. So if you're thinking about which stats to aim for in other slots, you could go for Conserve MP, but it's honestly nothing more than filler.
Storm -- Whether you play Scholar as a main or support job, the single most important thing about casting Storms is stacking up on Enhancing Magic Duration. Nothing else is necessary.
Protect/Shell -- The same as Storm, except you can enhance Protect & Shell for yourself while wearing either Sheltered Ring or Brachyura Earring (they do not stack) at the time of casting. This boost will give Protect V & Shell V an extra 10 Defense and -2 Magic Damage Taken.
Boost/Gain -- Specific stat boosting spells for White Mage & Red Mage reach +25 potency with a cap of 500 Enhancing Magic Skill. Fill the other slots with Enhancing Magic Duration.
Temper -- Standard Temper grants extra Double Attack, and Temper II gives Triple Attack. You gain more multi-attack for every 10 Enhancing Magic Skill, and there is no cap, so stack as much as you possibly can for increased TP potential.
Enspell (RDM) -- While this guide tries not to be so job specific, it's important to explain Enspell before the next line of spells. There isn't a known cap on potency for regular Enspells, and the formula changes depending on your Enhancing Skill. Red Mage's stack up on Skill for its cast, and we'll go over enhancing it further (as you melee) in the advanced section.
Enlight (PLD) / Endark (DRK) -- To simplify the formula, you move up a tier in potency for every 20 Divine/Dark Magic Skill at the time of casting. For example, if your Dark Knight has 598 Dark Magic Skill, your Endark II would have the same potency at 580, but would move up a tier if you got to 600. This is important, because you only need enough skill to reach a tier, and the other slots can be used for defensive stats. Consider using a macro with a capped Fast Cast set to start Enlight & Endark, and finishes with your Divine/Dark Magic Skill set.
Spikes -- Blaze, Ice & Shock Spikes are rarely geared for, but if you want them to last longer you can cast in an Enhancing Duration set. They do more damage if you stand in Magic Attack Bonus equipment.
Dark Knight's Dread Spikes is different because it is classed as Dark Magic and won't last longer with Enhancing Duration, nor be affected by Magic Attack Bonus. The only ways to enhance it is with Dread Spikes specific equipment and stacking heavily on HP. Potency from HP is based on the player's maximum, and not the current.

*Artwork by Efui (2008 FFXI Contest Winner)
Enfeebling
Enfeebling enemies is something I found great pride in as a master Scholar, but when I started gearing Red Mage two years ago, it opened up a whole new can of worms. I wanted to ensure I got the best out of my enfeebling, so I digged around, asked a few people, and made sets for every type of spell there is. It took a long time, but I was pleased with the results. I'm not saying everyone should go this far, because other mages have things to do, but being able to help out when called upon shouldn't be ignored. The first thing I tell players who can enfeeble, is to make a magic accuracy set, but there's more to it than that. There are ways to make enfeebling better, and doing so could make the difference. Some enemies need to remain enfeebled, and if everyone plays their part, it makes landing them easier for all. Just because a Red Mage has incredible enfeebling power, doesn't mean you can't give them a helping hand.
There is a state in the game called "Immunobreak" which can happen while resisting enfeebles. It increases the chance of landing the same spell if cast shortly after, and this chance increases the more you see Immunobreak in the log. However, it resets when the spell lands, so if you wanted to reapply the enfeeble, it may take just as, if not more Immunobreaks to bring it back to the point you can. This is why, as a Red Mage, I would heavily encourage others to help me out. For example, if I'm struggling to land Silence, I'd like everyone (who can without hurting our chances) to cast Silence so we can get Immunobreaks. This way, we would be more likely to land Silence than if others sit around and watch me struggle on my lonesome.
Anybody casting enfeebles can help to gain Immunobreaks, except if the enemy "completely resists". The game tells you if an enfeeble is one they completely resist, so no amount of repeated spells will gain Immunobreak. Currently, there is only one piece of equipment with an Immunobreak stat, which is Chironic Hose (WHM/RDM/BRD/SCH). As this is Reisenjima Geas Fete equipment, you can augment it with tons of magic accuracy and use it in some of your enfeebling sets. I prefer Chironic Hose over something with slightly more magic accuracy, but the augment needs to be decent. I would say to aim for at least 30 magic accuracy. The last thing to note about Immunobreak is it won't work on spells which can't resist, like Dia, Inundation, or Elemental/Dark magic spells Impact & Bio.
Now we have explained Immunobreak, let's take a look at enfeebling spells which most jobs can use:
Dia -- It would only fail to land if the enemy completely resists or has a magic shield up, which is rare and shouldn't be considered. Because of this, the only way to enhance it outside of Red Mage would be to make a set with Enfeebling Magic Duration. Here's a list of available options for non-RDMs.
Obstinate Sash (+5)
Kishar Ring (+10)
Regal Cuffs (+20)
Slow/Paralyze/Addle -- These spells gain penalties if your MND isn't high enough compared to your target, so it's crucial you stack as much as you can, but you also need magic accuracy to land. It's a fine balancing act, and what makes the best set depends on what you're fighting. They last long enough to shy away from duration (Paralyze is 120 seconds and can't be changed). It's super rare you would ever aim for Immunobreak, so you can use something better than Chironic Hose. Enfeebling potency equipment is said to help, but they are Red Mage only.
Silence -- It is best cast with a pure Magic Accuracy set, and it isn't affected by Potency or Duration (it is set like Paralyze). MND improves magic accuracy of White Magic, but it's hard to say how by exactly. Stack Magic Accuracy, followed by MND, and use Chironic Hose to help land it on anything resistant.
Poison -- Outside of Red Mage's Frazzle/Distract III, Poison is the only other spell relying hard on Enfeebling Magic Skill. There is no known cap on its potency, so feel free to use all the skill you have. After this, find as much Magic Accuracy and INT as you can to land. INT will count as extra magic accuracy because it's black magic.
Sleep/Sleepga/Break/Bind/Dispel/Dispelga -- They are all similar to Silence, except they are black magic, so INT would give you added magic accuracy. The difference is Sleep, Break and Bind can have their duration extended. If landing isn't an issue, you could make a duration set for Sleeps and Break, but you'd only seriously consider it if you are Red Mage or using Black Mage's Elemental Seal. A partially resisted Sleep would have its duration cut by half, so most are better off stacking Magic Accuracy and INT. You can only use Dispelga while equipping the Daybreak club from Lady Lilith.
Gravity -- It's the only spell enhanced solely by Enfeebling Magic Potency, and not by skill or any other stat. RDM is the only job which can gear hard for it, so all anyone else can do is prioritize Magic Accuracy first, and INT second.
Blind -- It works like Slow/Paralyze/Addle, except you're stacking INT to fight any incurring penalty. There are enemies like Maju (T3 Reisenjima) who has a gimmick where it needs to be blinded or it gets access to special moves, so it's a crucial part of the fight. Like Silence, this set benefits from Chironic Hose to encourage Immunobreaks. INT is important, but I'd say magic accuracy is more so for a gimmick like Maju's. Finally, Blind's duration can't be extended and is set to 180 seconds.
Distract/Frazzle -- Before doing any enfeebling, landing Frazzle on your enemy is a no-brainer, as it lowers your targets Magic Evasion. While both spells are classed as black magic, there is an Enfeebling Skill and MND modifier to decide how much Evasion/Magic Evasion they lose. However, the amounts of skill and MND to reach the cap is so low you don't need to go out of your way. Stack up on magic accuracy and you'll be fine. Also, remember you can have Distract and Frazzle up at the same time. If you have a RDM in your party, you're best off ignoring this altogether (unless they are KO/AFK), because they will be aiming for Distract/Frazzle III and won't need help with this. Sadly, you won't be able to land them on anything dark resistant, and Immunobreak won't help either.
-This covers most of the games enfeebling magic spells, except RDM specific Inundation; which you can treat like Dia. Next up are spells classed as Elemental, Divine, and Dark Magic which deal their own unique enfeebles.
--WIP--